11장. 통합개발환경에서 자이썬 사용하기
이 장에서는, 가장 인기있는 두 가지 통합개발환경, 이클립스와 넷빈을 사용한 자이썬 애플리케이션 개발에 대해 설명한다. 요즘은 파이썬과 자이썬 개발에 쓸 수 있는 다른 개발 환경도 많이 있지만, 그 두 가지가 아마도 가장 인기 있고 자이썬에 적합한 도구를 갖추고 있을 것이다. 이클립스에는 여러 해 전부터 PyDev로 알려진 플러그인이 있었는데, 이 플러그인은 파이썬과 자이썬 애플리케이션을 유지하기 위한 풍부한 지원을 제공한다. 넷빈은 6.5 버전부터 파이썬과 자이썬 지원을 포함하기 시작했다. 넷빈 통합개발환경 역시 파이썬과 자이썬 애플리케이션 개발과 유지보수를 위한 풍부한 지원을 제공한다.
이 장에서는 파이썬과 자이썬을 자이썬으로 부르도록 하겠다. 별도로 명시하지 않는 한 통합개발환경의 모든 선택사항은 파이썬과 자이썬에서 사용할 수 있다. 쉽게 읽을 수 있도록 하고 일관성을 위해서, 파이썬이나 자이썬에 해당되지 않는 기능 이외에는 파이썬과 자이썬을 구분하지 않을 것이다. 플러그인은 원래 이름 그대로 부를 것이므로, 넷빈의 경우에는 넷빈 파이썬 플러그인으로 부르도록 하겠다. 이 플러그인은 모든 경우에 파이썬과 자이썬 양쪽에서 작동한다.
이클립스
이클립스에서 자이썬을 사용하려면 당연히 컴퓨터에 이클립스부터 설치해야 할 것이다. 이 책을 쓸 당시 최근 버전은 이클립스 3.5(이클립스 갈릴레오로 알려져 있기도 하다)이며, 이 장에서 권장하는 버전이기도 하다. 3.2, 3.3 그리고 3.4 버전도 사용할 수 있지만, 사소한 사용자 인터페이스의 차이가 있기 때문에 이 장에서는 혼동될 수도 있다.
이클립스가 컴퓨터에 설치되어 있지 않으면 www.eclipse.org/downloads에서 자바 개발자용 버전을 다운로드하기 바란다.
PyDev 설치
이클립스에는 자이썬 지원이 포함되어 있지 않다.따라서, 우리는 자이썬에 대한 특화된 지원과 함께 파이썬 언어에 대한 지원을 추가해주는 훌륭한 플러그인인 PyDev를 사용할 것이다. PyDev의 홈 페이지는 http://pydev.org이지만 수동으로 다운로드하여 설치할 필요는 없다.
플러그인을 설치하려면 이클립스를 시작하고 도움말 > Install New Software...로 가서 ‘Work with’ 입력 상자에 http://pydev.org/updates를 입력한다. Enter를 누른다. 잠시 후에, 아래의 큰 상자에 PyDev에 대한 항목이 표시된다.그것을 선택하고 PyDev의 왼쪽에 표시한 다음 (그림 11-1 참조), 다음 버튼을 누른다.
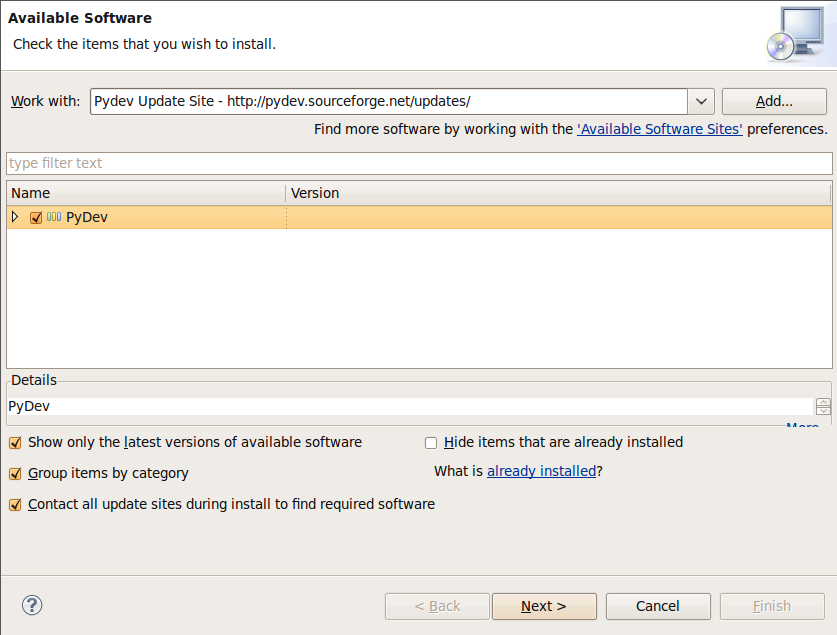
그림 11-1. PyDev 설치
그 다음은, 마법사를 따라서, 라이선스 동의서를 읽고, 이클립스 공중 라이선스 버전 1.0에 동의하는 경우에는 수락한다. 그런 다음 완료 단추를 누른다.
이클립스에 의해 플러그인이 설치되고 나면, 플러그인을 사용할 수 있도록 하기 위해 통합개발환경을 재시작할 것인지 물어볼 것이다. 그것을 권장하므로, 그렇게 하도록 하자. 이클립스를 재시작하고 나면, 통합개발환경에서 모든 파이썬 지원을 누릴 수 있다.
최소 구성
PyDev 프로젝트를 시작하기 전에 사용가능한 파이썬 번역기가 어느 것인지를 PyDev에게 알려주어야 한다.여기서 번역기란 파이썬 구현을 설치한 것을 말한다. 일반적으로 번역기는 하나만 있으면 되며, 이 장에서는 자이썬 2.5.1만을 사용할 것이다. 설정을 위해서, 이클립스 환경설정 창을 연다(주 메뉴 막대에서 창>환경 설정). 왼쪽 상단 패널의 텍스트 상자(‘필터 텍스트’라고 한다)에 ‘Jython’이라고 입력한다. 이것은 이클립스의 (또한 PyDev의!) 무수히 많은 선택사항을 걸러서 아주 단순하게 보여주며, 왼쪽의 ‘Interpreter - Jython’을 선택하면 된다.
‘Interpreter - Jython’ 부분을 선택하면, 오른편 위에 자이썬 번역기 목록이 비어있을 것이 보일 것이다.우리는 그것을 고치면 된다. 그러므로, ‘새로 작성’ 버튼을 누르고, ‘Jython 2.5.1’을 번역기 이름으로 입력하고, Browse를 누르고, 자이썬 2.5.1 설치본에서 jython.jar를 찾는다.
Note
이것이 우리가 이 장에서 사용할 수 있는 유일한 런타임이라 할지라도, 번역기의 이름을 정할 때에는 여기에서 제시된 구현 이름 (Jython)과 전체 버전 (2.5.1) 모두를 포함하는 명명법을 사용하기를 권한다. 그렇게 함으로써 나중에 새로운 번역기를 추가할 때 발생할지 모를 혼란과 충돌을 피할 수 있다.
jython.jar 파일을 선택한 후에는, PyDev는 자동으로 기본값인, 전역 sys.path 항목을 찾아낼 것이다. PyDev은 항상 올바른 값을 추론하므로, 매우 특별한 요구 사항이 없다면 그저 기본 설정값을 받아들이고 확인 버튼을 누르면 된다.
모두 잘 되었다면, 방금 입력한 정보를 반영하고 있는 자이썬 번역기 목록이 보일 것이다. 그림 11-2과 비슷할 것이다(물론 파일 시스템 경로는 다를 수 있다).
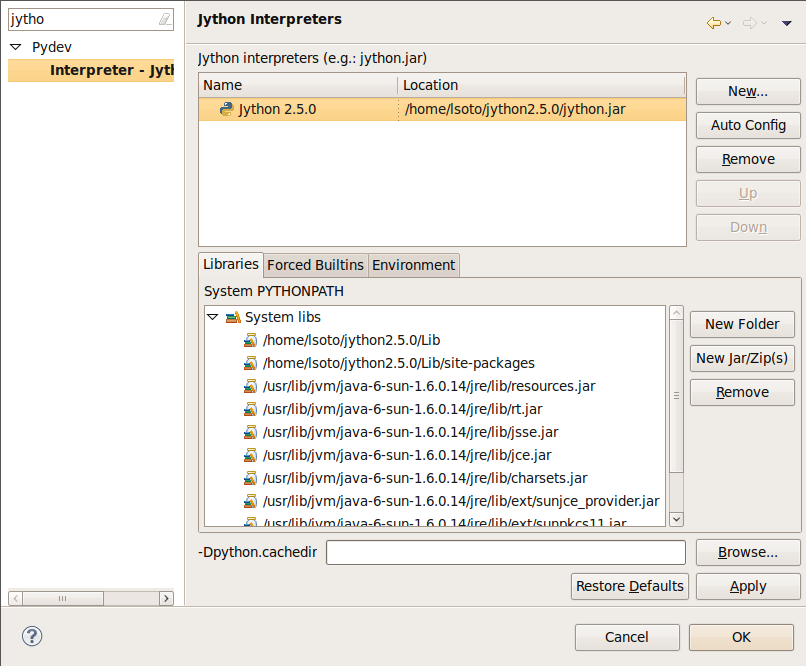
그림 11-2. 자이썬 번역기 목록
이것이 전부이다! 확인을 누르면 현대적인 통합개발환경의 지원을 즐기면서 자이썬으로 개발을 할 준비가 된 것이다.
호기심이 생긴다면, 환경 설정 창의 PyDev 부분 아래의 다른 선택사항들을 살펴보라(자이썬 번역기 설정으로 빨리 이동하기 위해 사용했던 검색 필터를 지우고 나서). 하지만 경험상으로는, 다른 선택사항 중에 딱히 바꿔야 할 것은 없다.
다음 절에서는 보다 즐거운 배움의 경험을 선사하며 여러분을 보다 생산적으로 만들어줄 PyDev의 주요 기능을 살펴보도록 하겠다.
Hello PyDev!: 프로젝트 만들기 및 모듈 실행
이 장의 첫번째 예제 코드는 지나치게 단순해 보일 것이다.그것은 사실 아주 바보 같은 예제이다. 간단한 프로젝트에나 복잡한 프로젝트에나 적용할 수 있는, 이클립스 통합개발환경 내의 어떠한 파이썬 기반 프로젝트의 라이프 사이클을 위해서든 행하여야 할 기본 절차에 초점을 맞추는 것이다. 그래서, 아마 짐작하겠지만, 우리의 첫번째 프로젝트는 Hello World이다. 시작하자!
파일>새로 작성>프로젝트로 가도록 하자.이클립스로 생성할 수 있는 모든 종류의 프로젝트의 목록이 표시된다. PyDev 그룹 아래의 PyDev Project를 선택하자(상단 필터 텍스트 상자에 ‘PyDev Project’라고 치는 것이 더 빠르다면 그렇게 해도 된다).
다음 대화 상자는 프로젝트 속성에 대해 물을 것이다. 프로젝트 이름은 LearningPyDev라고 하자. ‘Project contents’ 란에 ‘Use default’를 체크하여, PyDev가 이클립스 작업공간 내의 프로젝트와 같은 이름의 디렉토리를 생성하도록 하자(이클립스 프로젝트의 최상위 경로가 된다). 우리는 Jython 2.5.1를 사용하고 있기 때문에, Project type은 Jython으로, grammer version은 2.5로 바꾼다. Interpreter는 최소 구성 절에서 Jython interpreter로 정의한 것이 default이므로 그대로 둔다. ‘Create default ‘src’ folder and add it to the pythonpath’ 선택사항도 이클립스의 관행이므로 체크된 대로 둔다.
완료를 누르면, PyDev는 빈 src 디렉토리와 사용할 번역기에 대한 참조만 가진 프로젝트를 생성한다.이제 우리의 프로그램을 만들어 보자.
프로젝트를 오른쪽 클릭하고 새로 작성> PyDev 모듈을 선택한다. Package는 공백으로 두고 Name 란에 ‘main’을 입력한다. PyDev는 새로운 모듈을 빨리 만들 수 있는 템플릿을 제공하지만, 우리는 더 간단한 것을 만들 것이므로 사용하지 않을 것이다. 그래서 Template 란을 비워두고 완료를 클릭한다.
PyDev는 방금 생성한 main.py를 위한 편집기를 선물할 것이다. 우리의 프로그램을 구현할 시간이다.편집기에서 다음 코드를 작성하자.
예제 11-1.
if __name__ == "__main__":
    print "Hello PyDev!"
그리고 나서 프로그램을 실행하려면 Ctrl + F11을 누른다.나타나는 대화창에서 Jython Run을 선택하고 확인을 클릭한다. 프로그램이 실행되어 ‘Hello PyDev!’가 통합개발환경의 하단 영역에 있는 콘솔에 나타날 것이다.
Note
(‘Jython Run’에 Ctrl + F11 같은) 단축키에 대해 설명할 때에는 PC 키보드의 관습을 따르도록 하겠다. Mac 사용자는 따로 언급하지 않는 한, 이 장에 나오는 모든 단축키에 대해 Ctrl 키 대신에 Command 키를 누르면 된다.
수동으로 프로그램을 입력하다보면, 통합개발환경이 파이썬에서는 ‘:’ 부호로 행이 끝나면 블록이 시작된다는 것을 알고서 자동으로 커서를 적당한 들여쓰기 수준으로 갖다놓는다는 것을 아마 눈치채게 될 것이다. 이러한 결정을 무시하고 출력문을 if와 같은 수준의 들여쓰기에 놓고 파일을 저장하면 어떻게 될까. 통합개발환경은 그 줄에 오류가 있다는 강조 표시를 할 것이다. 오류 표시 위에 마우스 포인터를 올려두면 그림 11-3과 같이 오류에 대한 설명이 나타날 것이다.
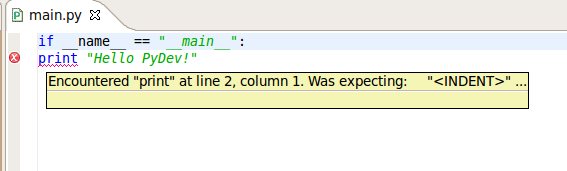
그림 11-3. 오류 표시 위로 마우스 포인터를 올려두면 오류에 대한 설명이 표시된다.
어떤 구문 오류를 내더라도 같은 식으로 반응이 돌아온다고 보면 된다. 사소한 문법 오류를 찾기 위해 고치고 실행시키는 쳇바퀴를 도는 좌절을 피하는 데 도움이 되는 기능이다.
명령줄 인수 전달하기와 맞춤 실행
명령줄 인수는 구식인 것처럼 보여도 사실은 프로그램이 외부와 상호작용할 수 있는 매우 간단하고 효과적인 방법이다. 자이썬을 스크립트 언어로서 배웠기 때문에, 명령줄에서 입력을 받아들이는 스크립트를 짜는 것이 생소하지 않을 것이다(무인 실행을 위해서는, 명령행으로부터 입력을 읽어들이는 것이 GUI를 통하지 않고서 표준입력으로부터 데이터를 얻는데 있어 보다 편리한 방법인 것이다).
아마 짐작하겠지만, 우리는 명령줄 인수를 받아들이는 장난감 프로그램을 만들 것이다. 보다 개인화된 솔루션을 만들기 위해, 인수는 인사를 건넬 사용자의 이름을 대표하도록 할 것이다. 우리의 main.py는 이렇게 생겼다.
예제 11-2.
import sys
if __name__ == "__main__":
    if len(sys.argv) < 2:
        print "Sorry, I can't greet you if you don't say your name"
    else:
        print "Hello %s!" % sys.argv[1]
Ctrl + F11을 다시 치면, 콘솔에 ‘Sorry I can’t greet you...’ 메시지가 뜨는 것이 보일 것이다. 이름을 알려주지 않았으니 그럴 법도 하다. 이름을 말할 기회를 주지 않았으니, 여러분의 잘못은 아니다.
명령줄 인수를 지정하려면 실행> 실행 구성 메뉴로 가서, 왼쪽의 Jython Run에서 ‘LearningPyDev main.py’라는 이름의 항목을 찾도록 하자. 이미 선택이 되어있을 것인데, 혹시 그렇지 않다면 수동으로 선택하도록 하라. 그런 다음, 대화 상자의 주 영역에서, 우리 스크립트 실행을 커스터마이즈하는 방법을 찾을 것이다. 당신은 현재 디렉토리와 같은 측면을 변경한다든지, JVM에 특별한 인자를 전달한다든지, 사용할 번역기를 변경한다든지, 환경 변수를 설정한다든지 하는 것들을 할 수 있다. 우리는 그저 인수만 지정할 것이므로, ‘Program arguments’ 상자에 ‘Bob’을 입력하고 실행을 클릭하자.
예상한대로, 프로그램은 이제 ‘Hello Bob!’을 콘솔에 출력한다. 입력한 값은 기억된다는 것에 주의하기 바란다;다시 말해서, 지금 Ctrl + F11을 누른다면 프로그램은 ‘Hello Bob!’을 또 출력할 것이다. 인자를 바꿀 때마다 실행 구성 창을 매번 띄워야한다는 점 때문에, 어떤 사람들은 이런 프로그램을 시험하기 위해 이렇게 하는 것이 매우 이상하다고 지적할 것이다. 그렇지만 우리가 정말로 우리의 프로그램을 시험하고자 한다면(좋은 생각이다), 우리는 올바른 방법으로 시험을 해야할 것이다. 그건 곧 살펴보겠지만, 일단은 통합개발환경의 기본 기능에 대한 여행을 마무리하는 것이 우선이다.
편집기 갖고 놀기
이제 우리의 예제 코드를 좀 더 확장해서, 다른 방법과 언어로 사용자에게 인사를 해보자. 이번에는 인수 처리를 위해 optparse 모듈을 사용할 것이다. optparse의 사용법에 대해 기억을 되살리려면 9장을 참조하기 바란다. 우리는 새로운 방법을 사용자를 맞이하도록 프로그램을 확장하기 위해 장식자를 사용할 것이다. (4장을 보라) 자, 우리의 조그만 main.py가 이제 조금 커졌다.
예제 11-3.
# -*- coding: utf-8 -*-
import sys
from optparse import OptionParser

greetings = dict(en=u'Hello %s!',
                 es=u'Hola %s!',
                 fr=u'Bonjour %s!',
                 pt=u'Alò %s!')

uis = {}
def register_ui(ui_name):
    def decorator(f):
        uis[ui_name] = f
        return f
    return decorator

def message(ui, msg):
    if ui in uis:
        uis[ui](msg)
    else:
        raise ValueError("No greeter named %s" % ui)

def list_uis():
    return uis.keys()

@register_ui('console')
def print_message(msg):
    print msg

@register_ui('window')
def show_message_as_window(msg):
    from javax.swing import JFrame, JLabel
    frame = JFrame(msg,
                   defaultCloseOperation=JFrame.EXIT_ON_CLOSE,
                   size=(100, 100),
                   visible=True)
    frame.contentPane.add(JLabel(msg))

if __name__ == "__main__":
    parser = OptionParser()
    parser.add_option('--ui', dest='ui', default='console',
                      help="Sets the UI to use to greet the user. One of: %s" %
                      ", ".join("'%s'" % ui for ui in list_uis()))
    parser.add_option('--lang', dest='lang', default='en',
                      help="Sets the language to use")
    options, args = parser.parse_args(sys.argv)
    if len(args) < 2:
        print "Sorry, I can't greet you if you don't say your name"
        sys.exit(1)

    if options.lang not in greetings:
        print "Sorry, I don't speak '%s'" % options.lang
        sys.exit(1)

    msg = greetings[options.lang] % args[1]

    try:
        message(options.ui, msg)
    except ValueError, e:
        print "Invalid UI name\n"
        print "Valid UIs:\n\n" + "\n".join(' * ' + ui for ui in list_uis())
        sys.exit(1)
이 코드를 갖고 편집기에서 좀 놀아보도록 하자. 코드 자동 완성(마이크로소프트 식으로는 인텔리센스라고 부른다) 단축키인 Ctrl + 스페이스를 서로 다른 곳에서 눌러보라(이 단축키는 모든 플랫폼에서 동일하므로, 맥 OS X를 사용하더라도 Ctrl을 Command로 바꾸지 않도록 하라). 그것은 가져오기 구문을 완성시켜주며(import만 치거나 OptionParser의 중간에서 완성시켜보라) 속성 또는 메소드 접근을 완성시켜준다(sys.exit나 parser.add_option 같은 것, 심지어 자바 클래스의 JFrame.EXIT_ON_CLOSE까지도!).그것은 또한 메소드의 경우에는 매개 변수에 대한 힌트를 제공한다.
일반적으로, 방금 입력한 기호에 대하여 도움을 주기 충분할 만큼 통합개발환경이 알고 있다면, 마침표를 칠 때마다 자동완성목록이 뜬다. 하지만 어느 때든지 도움을 호출할 수 있다. 예를 들어, 코드 끝으로 가서 ‘message(‘를 입력해보라. 그 함수의 매개변수 순서를 잊어버렸다고 하자. 해결 방법은 Ctrl + 스페이스를 누르고 그 함수의 매개변수 이름으로 구문을 완성시키는 것이다.
또한 ‘def’ 같은 열쇠말에 대해 Ctrl + 스페이스를 시험해보라.PyDev는 타이핑을 줄일 수 있도록 약간의 템플릿을 제공할 것이다. 이클립스 환경 설정 창(메인 메뉴에서 창>환경 설정)의 PyDev>편집기>템플릿에서 템플릿을 원하는 대로 설정할 수 있다.
여기서 주목할 만한 또 다른 점은, 가져오기한 것, 함수, 전역변수를 가진 보다 규모가 있는 프로그램을 통합개발환경의 오른쪽 아웃라인 패널에서 트리구조로 보여준다는 점이다. 그것은 클래스도 역시 보여준다.
그리고 코드를 실행하는 것을 잊지 않도록 하라!물론, Ctrl + F11을 누른 후에 콘솔에 여전히 지루한 ‘Hello Bob!’ 텍스트를 보여준다는 것은 그리 대단치는 않다. 하지만 (실행 구성 대화창을 통해) 명령줄 인자를 ‘Bob –lang es –ui window’와 같이 편집한다면 스페인어로 밥에게 인사를 건네는 훌륭한 창이 뜰 것이다. 또한 지원이 되지 않는 UI(이를테면, –ui speech)라든지 지원되지 않는 언어를 지정한다면 어떤 일이 일어나는지도 보라. 우리는 심지어 –help도 지원한다! 그러니까 우리는 (명령줄 프로그램 표준에서) 튼튼하고 사용자 친화적인 일반적인 다국어 인사를 가진다.
지금쯤 여러분은 아마도 대화창에서 명령줄 인수를 편집해가며 프로그램을 테스트하느라 지쳤을 것이다. 한 단락 뒤에는 통합개발환경을 사용하여 프로그램을 테스트하는 더 나은 방법을 보게 될 것이다. 사실, 다음 절의 일부가 그 해결책으로 나아가는데 도움이 될 것이다.
구조 맛보기: 패키지, 모듈, 그리고 네비게이션
단순성을 좋아한다면 지난 예제를 과도하게 고친 이유를 물을지(혹은 독자의 성격에 따라서는 욕을 할지) 모른다. 같은 문제 구문에 대해 (더욱 간결하고 이해하기 쉬운 코드라는 의미에서) 더 간단한 해결책이 있다. 하지만 우리는 장난감 코드를 좀 더 발전시켜서 통합개발환경의 또 다른 측면, 즉 사람들이 통합개발환경을 사용하는 이유인 복잡한 코드 바탕의 조직화에 대해 살펴볼 필요가 있다. 그러니 이 책에서는 본격적인 애완동물 상점 예제를 기대하지 않기 바란다.
그러면, 우리가 약간 복잡한 문제를 다루고 있기 때문에 (주로 장식자를 통해 노출된 UI의 등록) 확실하게 납득할 만한 복잡성에 직면하고 있다고 가정하자. 다시 말해서, 추정하자.
요점은, 우리의 프로젝트의 거의 대부분을 단 하나의 파일(한 개의 파이썬 모듈)에 국한할 수 없다는 사실이다. 심지어 우리의 아주 바보 같은 예제는 읽기에도 불쾌해지기 시작한다. 그리고, 우리가 한 개의 모듈 이상을 필요로 한다는 것을 깨달을 때, 우리 모듈이 가까운 것들을 함께 그리고 다른 프로젝트와 이름이 충돌하는 기회를 줄이기 위해 공통된 우산 아래로 그룹화할 필요가 있다는 것을 깨닫는 것이다. 따라서, 8장에서 보았던 것과 같이, 이러한 문제에 대한 파이썬의 해결책은 모듈과 패키지이다.
우리의 계획은 모든 것을 ‘hello’ 패키지 아래에 오도록 코드를 구성하는 것이다. 언어 지원 등의 핵심 로직은 패키지 자체(__init__.py 파일)로 보내고, 각 UI는 ‘hello’ 패키지 아래의 자체 모듈 아래로 이동하는 것이다. main.py 스크립트는 명령줄 진입 지점으로 남겨둔다.
프로젝트를 오른쪽 클릭하고 새로 작성>PyDev 패키지를 선택한다. 이름으로 ‘hello’를 입력하고 완료를 클릭한다. PyDev가 패키지를 생성하고 그것의 __init__.py 파일이 편집기에서 열릴 것이다. 우리가 말했듯이, 우리는 이 패키지의 핵심 로직을 이동시킬 것이므로, 이 파일은 이전 버전의 메인 코드로부터 추출한 다음과 같은 코드를 가질 것이다.
예제 11-4.
# -*- coding: utf-8 -*-
greetings = dict(en=u'Hello %s!',
                 es=u'Hola %s!',
                 fr=u'Bonjour %s!',
                 pt=u'Alò %s!')

class LanguageNotSupportedException(ValueError):
    pass

class UINotSupportedExeption(ValueError):
    pass

uis = {}
def register_ui(ui_name):
    def decorator(f):
        uis[ui_name] = f
        return f
    return decorator

def message(ui, msg):
    '''
    Displays the message `msg` via the specified UI which has to be
    previously registered.
    '''
    if ui in uis:
        uis[ui](msg)
    else:
        raise UINotSupportedExeption(ui)

def list_uis():
    return uis.keys()

def greet(name, lang, ui):
    '''
    Greets the person called `name` using the language `lang` via the
    specified UI which has to be previously registered.
    '''
    if lang not in greetings:
        raise LanguageNotSupportedException(lang)
    message(ui, greetings[lang] % name)
우리는 우리의 코드를 모듈화하는 아이디어를 받아들여서, greeter를 호출할 때 발생하는 문제를 표준 출력에 직접 찍는 대신, 클라이언트에게 알려주는 예외를 제공할 것임에 주의하라.
이제 우리는 콘솔 UI를 갖는 hello.console 모듈을 생성했다. 프로젝트를 마우스 오른쪽 단추로 누르고, 새로 만들기>PyDev Module을 선택하고, ‘hello’를 패키지로, ‘console’을 이름으로 입력하라. 프로젝트 대신 패키지를 오른쪽 클릭한다면 패키지 이름을 타이핑하는 것을 피할 수 있다. 완료를 클릭하고 print_message 함수를 거기에 복사한다.
예제 11-5.
from hello import register_ui

@register_ui('console')
def print_message(msg):
    print msg
마찬가지로, hello 패키지 내부 창 모듈을 만들고 거기에 show_message_as_window에 대한 코드를 삽입 :
예제 11-6.
from javax.swing import JFrame, JLabel
from hello import register_ui

@register_ui('window')
def show_message_as_window(msg):
    frame = JFrame(msg,
                   defaultCloseOperation=JFrame.EXIT_ON_CLOSE,
                   size=(100, 100),
                   visible=True)
    frame.contentPane.add(JLabel(msg))
마침내, 우리의 오랜 main.py는 아래와 같이 모양이 약간 바뀌었다.
예제 11-7.
import sys
import hello, hello.console, hello.window
from optparse import OptionParser

def main(args):
    parser = OptionParser()
    parser.add_option('--ui', dest='ui', default='console',
                      help="Sets the UI to use to greet the user. One of: %s" %
                      ", ".join("'%s'" % ui for ui in list_uis()))
    parser.add_option('--lang', dest='lang', default='en',
                      help="Sets the language to use")
    options, args = parser.parse_args(args)
    if len(args) < 2:
        print "Sorry, I can't greet you if you don't say your name"
        return 1
    try:
        hello.greet(args[1], options.lang, options.ui)
    except hello.LanguageNotSupportedException:
        print "Sorry, I don't speak '%s'" % options.lang
        return 1
    except hello.UINotSupportedExeption:
        print "Invalid UI name\n"
        print "Valid UIs:\n\n" + "\n".join(' * ' + ui for ui in hello.list_uis())
        return 1
    return 0

if __name__ == "__main__":
    main(sys.argv)
Tip
지금까지는, PyDev의 마법사를 사용하여 새로운 모듈과 패키지를 생성하였다.
하지만, 7장에서 본 것과 같이, 모듈은 그저 sys.path 또는 내부 패키지에 위치한 .py 확장자를 가진 파일일 뿐이며, 패키지는 __init__.py 파일을 가지게 된 디렉토리에 불과하다.
그러므로 마법사를 쓰는 것이 내키지 않는다면, 을 사용하여 새로운 모듈을 만들거나 를 사용하여 패키지를 만들 수 있다.
이제 우리의 코드는 많은 파일로 분할되어 있다.작은 프로젝트에서는 왼쪽편 프로젝트 트리(PyDev 패키지 탐색기라고 한다)를 돌아다니는 것이 어렵지 않겠지만, 수십 개의 파일이 있는 프로젝트라면 만만치 않을 것이다. 그래서 코드를 찾기 쉽게하게 하는 몇 가지 방법을 알아보겠다.
첫째, main.py를 읽고 있으며, 17행에서 호출하는 hello.greet 함수의 정의로 이동하고 싶다고 하자. 수동으로 그 파일로 이동하여 그 함수를 찾는 대신에, 그저 Ctrl을 누르고 greet을 클릭한다. PyDev는 자동으로 그 정의로 이동합니다.이것은 대부분의 변수나 모듈에 대해서도 동작한다(예제의 import 문에 대해서 시도해보라).
패키지 탐색기에 의지하지 않고 파일 사이를 넘나들 수 있는 또 다른 좋은 방법으로 “자원 열기”의 지름길인 Ctrl + Shift + R이 있다. 그냥 열고 싶은 파일 이름의 일부분만 치면 PyDev가 열려있는 프로젝트의 모든 패키지와 디렉토리를 검색해준다.
많은 파일이 있으니, 수행하고 싶은 파일을 반드시 열어서 편집기에서 활성화시켜야 할 필요는 없다는 것을 알아두라. (프로그램을 편집한 다음 Ctrl + F11을 누르는 절차를 사용하여) 수행하는 모든 스크립트에 대해 통합개발환경은 수행중에 관심 있는 것을 기억하여 “히스토리 실행”에 추가한다. 주 메뉴의 실행 -> 히스토리 실행 또는 주 도구모음의 녹색 “실행” 아이콘의 드롭다운 버튼을 통해 “히스토리 실행”에 접근할 수 있다. 두 곳 모두에서 최근에 수행한 프로그램을 찾을 수 있으며, 이 목록을 사용하여 재실행하고자 하는 스크립트를 선택하는 것이 스크립트로 이동하여 Ctrl + F11을 누르는 것보다는 한층 편리할 것이다.
마지막으로, 웹 브라우저에서 웹 페이지를 방문하는 것과 마찬가지로 통합개발환경은 내부적으로 파일을 넘나든 기록을 갖고 있다. 그러므로 마치 웹 브라우저처럼 앞뒤로 이동할 수 있다. 이동을 위해서는 도구모음의 적당한 버튼을 누르거나 기본 지름길인 Ctrl + 왼쪽화살표 및 Ctrl + 오른쪽화살표를 누르면 된다.
테스트
자, 이제는 우리가 여태껏 명령 줄 변수를 바꿔가며 출력결과를 관찰해왔던 성가신 수동 블랙 박스 테스트에 의지하지 않고 우리의 코드를 시험할 수 있는 선택 사항들을 살펴볼 시간이다.
PyDev는 통합개발환경에서 PyUnit 테스트를 실행할 수 있도록 지원하며, 우리는 그것을 작성할 것이다. 다음 코드와 같이 hello 패키지에 tests라는 이름의 모듈을 생성하자.
예제 11-8.
import unittest
import hello
class UIMock(object):
    def __init__(self):
        self.msgs = []
    def __call__(self, msg):
        self.msgs.append(msg)
class TestUIs(unittest.TestCase):
    def setUp(self):
        global hello
        hello = reload(hello)
        self.foo = UIMock()
        self.bar = UIMock()
        hello.register_ui('foo')(self.foo)
        hello.register_ui('bar')(self.bar)
        hello.message('foo', "message using the foo UI")
        hello.message('foo', "another message using foo")
        hello.message('bar', "message using the bar UI")
    def testBarMessages(self):
        self.assertEqual(["message using the bar UI"],
self.bar.msgs)
    def testFooMessages(self):
        self.assertEqual(["message using the foo UI",
                          "another message using foo"],
                          self.foo.msgs)
    def testNonExistentUI(self):
        self.assertRaises(hello.UINotSupportedExeption,
                          hello.message, 'non-existent-ui', 'msg')
    def testListUIs(self):
        uis = hello.list_uis()
        self.assertEqual(2, len(uis))
        self.assert_('foo' in uis)
        self.assert_('bar' in uis)
위와 같이 시험은 서로 다른 사용자 인터페이스에 메시지를 디스패치하는 기능을 커버한다. PyDev의 좋은 기능은 시험의 자동 발견으로, 이전의 테스트를 실행하기 위해 어떤 것도 코딩할 필요가 없다. 그저 패키지 탐색기에서 src 폴더를 오른쪽 단추로 클릭하고 실행 도구>Jython unit-test를 선택하면 된다. 거의 즉시 콘솔에서 시험 결과를 볼 수 있을 것이다.
예제 11-9.
Finding files...
['/home/lsoto/eclipse3.5/workspace-jythonbook/LearningPyDev/src/']
... done
Importing test modules ... done.
testBarMessages (hello.tests.TestUIs) ... ok
testFooMessages (hello.tests.TestUIs) ... ok
testListUIs (hello.tests.TestUIs) ... ok
testNonExistentUI (hello.tests.TestUIs) ... ok
----------------------------------------------------------------------
Ran 4 tests in 0.064s
OK
파이썬의 unittest가 파이썬 세계에서 선택할 수 있는 유일한 시험 방법은 아니다. 단위 테스트만큼 자동화되어 있으면서도, 더욱 블랙 박스답게 시험을 할 수 있는 편리한 방법인 doctest가 있다.
Note
시험 도구에 대해서는 18장에서 자세히 다룰 것이므로, 따라가기 힘들면 그 장을 보기 바란다.
doctests가 좋은 점은, 그것들이 번역기의 대화식 세션과 같이 보이기 때문에 상당히 읽기 쉽고 만들기 쉽다는 것이다. 우리는 doctest를 사용하여 console 모듈을 시험할 것이다.
먼저, 콘솔의 도구막대(왼쪽 위 모서리에 더하기 기호로 된 것 옆에, 마우스로 지나칠 때 콘솔 열기라는 팁이 나오는 것)에서 오른쪽 클릭한다. 메뉴에서, PyDev 콘솔을 선택한다. 다음 대화 상자에서 Jython Console이라고 답한다. 이렇게 하면 통합개발환경에 포함된 대화식 번역기를 쓸 수 있게 된다.
번역기를 사용하여 우리의 코드를 탐험하도록 하자.
예제 11-10.
>>> from hello import console
>>> console.print_message("testing")
testing
이 두 명령을 직접 입력해보기를 강력히 권하는 바이다. 코드 자동완성이 어떻게 대화식 번역기에서도 작동하는지 알게 될 것이다!
본론으로 돌아가서, 우리는 콘솔 모듈이 예상대로 작동하는지 그저 대화식으로 확인해보았다. 멋진 것은 우리는 이런 단편적인 코드(snipper)를 doctest에 복사하여 붙여넣음으로써, 방금 시험했던 것을 앞으로 똑같은 자동으로 실행하도록 만들 수 있다는 것이다.
‘hello’ 패키지에 doctest라는 이름의 모듈을 만들고 대화식 콘솔로부터 그 세 줄을 붙여넣어 세개씩으로 둘러싸서 붙여넣도록 하라(왜냐하면 그것들은 문법적으로는 전혀 올바른 파이썬 코드가 아니기 때문이다). 이 파일을 실행가능하게 만들기 위해 간단한 상용구를 덧붙이고 나면, 이렇게 보일 것이다.
예제 11-11.
"""
>>> from hello import console
>>> console.print_message("testing")
testing
"""
if __name__ == "__main__":
    import doctest
    doctest.testmod(verbose=True)
이렇게 하고 나면, 편집기에서 doctests.py 파일이 활성화되어 있을 때 실행 도구>Jython Run 메뉴를 통해 이 시험을 실행할 수 있다. 문제 없이 잘 된다면, 다음과 같은 출력을 얻을 것이다.
예제 11-12.
Trying:
    from hello import console
Expecting nothing
ok
Trying:
    console.print_message("testing")
Expecting:
    testing
ok
1 items passed all tests:
   2 tests in __main__
2 tests in 1 items.
2 passed and 0 failed.
Test passed.
Adoctest를 실행한 후에는 대화식 콘솔이 사라지고, 출력 콘솔에 시험 결과가 보여질 것이다. 대화식 콘솔로 돌아가려면, 탭 도구막대에서 콘솔을 spawn하는데 사용하였던 단추의 바로 왼쪽에 있는 콘솔 단추를 찾으면 된다. 그런 다음 그림 11-4에서와 같이 아래로 펼쳐지는 메뉴에서 PyDev 콘솔을 선택하자.
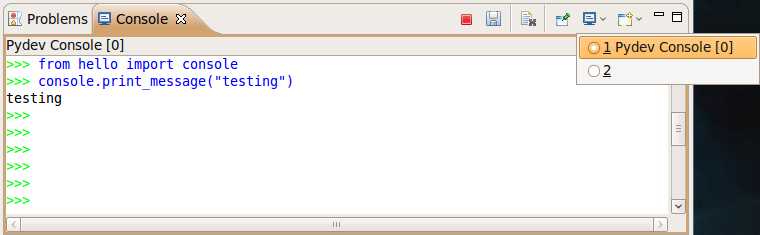
그림 11-4. Selecting PyDev Console
보는 바와 같이, 대화식 콘솔을 사용하여 코드를 실행하고, 아이디어를 시도하고, 시험할 수 있다. 그리고 나중에는 같은 대화식 콘솔 세션으로부터 텍스트를 단지 복사해서 붙여넣음으로써 간단히 시험해볼 수 있다. 자이썬 코드는 자바 API에 아주 쉽게 접근할 수 있으므로, 자바로 작성한 클래스도 이런 식으로 시험해볼 수 있다는 것이 특히 흥미로운 점이라 하겠다.
자바 프로젝트에 라이브러리 추가
끝으로, 프로젝트에 자바 라이브러리를 통합하는 방법을 보여주도록 하겠다.몇 페이지 앞에서 우리의 인사 프로그램에 ‘말하기’ 기능을 추가할 수 있다고 했다. 그리 나쁜 생각은 아닐 것이다. 자바 세계에는 (어떤 형태로든) 그 문제를 해결해줄 좋은 라이브러리가 있기 때문이다.
우리는 http://freetts.sourceforge.net/docs/index.php에서 다운로드할 수 있는 FreeTTS 라이브러리를 사용할 것이다.(바이너리 버전을 다운로드해야한다.)
FreeTTS을 다운로드 후, 하드 디스크에 어딘가에 압축을 풀어야 한다.그런 다음, FreeTTS로부터 우리의 PyDev 프로젝트에 JAR 파일을 가져온다.
프로젝트를 오른쪽 클릭하고 가져오기를 선택한다.그 다음에 일반>파일 시스템을 선택하고 FreeTTS가 있는 디렉토리를 선택한다. 마지막으로, 왼쪽 패널에있는 디렉토리를 펼쳐서 lib 디렉토리를 선택한다. 그림 11-5를 보라.
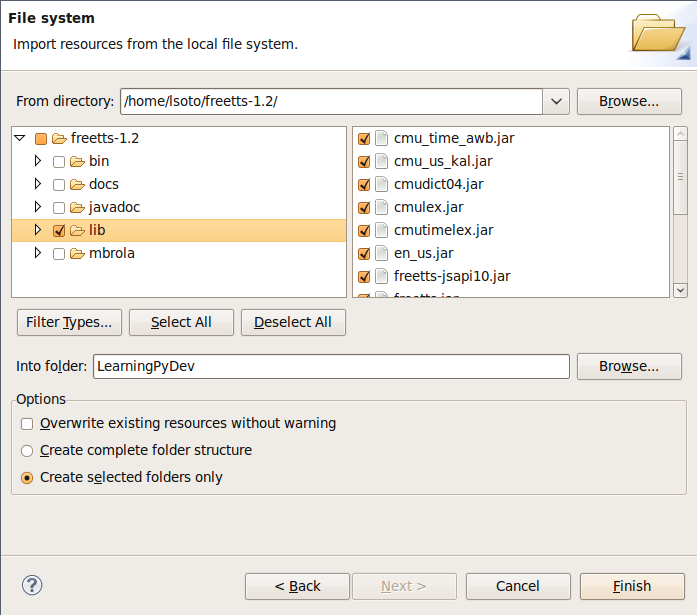
그림 11-5. 프로젝트에 자바 라이브러리 추가
마침을 클릭하면 해당 파일이 이제 프로젝트의 일부가 된 것을 볼 수 있을 것이다.
Tip
사용중인 운영 체제에 따라, (메뉴, 단축키, 또는 드래그 앤 드롭을 통해) 파일 관리자에서 파일이나 폴더를 복사하여 프로젝트에 붙여넣음으로써 동일한 조작을 수행할 수 있다.
자, 파일은 프로젝트의 일부분이지만 우리는 lib 디렉토리 / freetts.jar은 JAR 파일이며, 우리의 사업 환경의 sys.path에 추가되어 있어야 PyDev 얘기해야합니다. 그렇게 하려면, 프로젝트를 오른쪽 클릭하여 특성을 선택한다. 다음으로, 대화 상자의 왼쪽 패널에서, PyDev - PYTHONPATH를 선택한다. Then click the ‘Add zip/jar/egg’ button and select the lib/freetts.jar file on the right side of the dialog that will appear. Click OK on both dialogs and you are ready to use this library from Python code.
The code for our new hello.speech module is as follows:
예제 11-13.
from com.sun.speech.freetts import VoiceManager
from hello import register_ui
@register_ui('speech')
def speech_message(msg):
    voice = VoiceManager().getVoice("kevin16")
    voice.allocate()
    voice.speak(msg)
    voice.deallocate()
If you play with the code on the editor you will notice that PyDev also provides completion for imports statement referencing the Java library we are using.
Finally, we will change the second line of main.py from:
예제 11-14.
import hello, hello.console, hello.window
to
import hello, hello.console, hello.window, hello.speech
in order to load the speech UI too. Feel free to power on the speakers and use the –ui speech option to let the computer greet yourself and your friends!
There you go, our humble greeter has finally evolved into a quite interesting, portable program with speech synthesis abilities. It’s still a toy, but one which shows how quickly you can move with the power of Jython, the diversity of Java, and the help of an IDE.
디버깅
PyDev는 Jython 코드에 대한 완전한 디버깅 기능도 제공한다. 코드에서 더블 편집기의 왼쪽 가장자리를 클릭하여 일부 중단점을 넣어 시도하려면 다음 Ctrl + F11을 대신 F11을 눌러 바로 가기를 사용하여 프로그램을 시작한다.
일단 디버거가 중단점에 도달하면, IDE는 화면을 변경할 것인지 물어본다. 이는 디버깅을 하기에 더 적합한 다른 레이아웃으로의 변경을 의미한다. Yes를 선택하면 그림 11-6과 같은 디버깅 화면을 볼 수 있을 것이다.
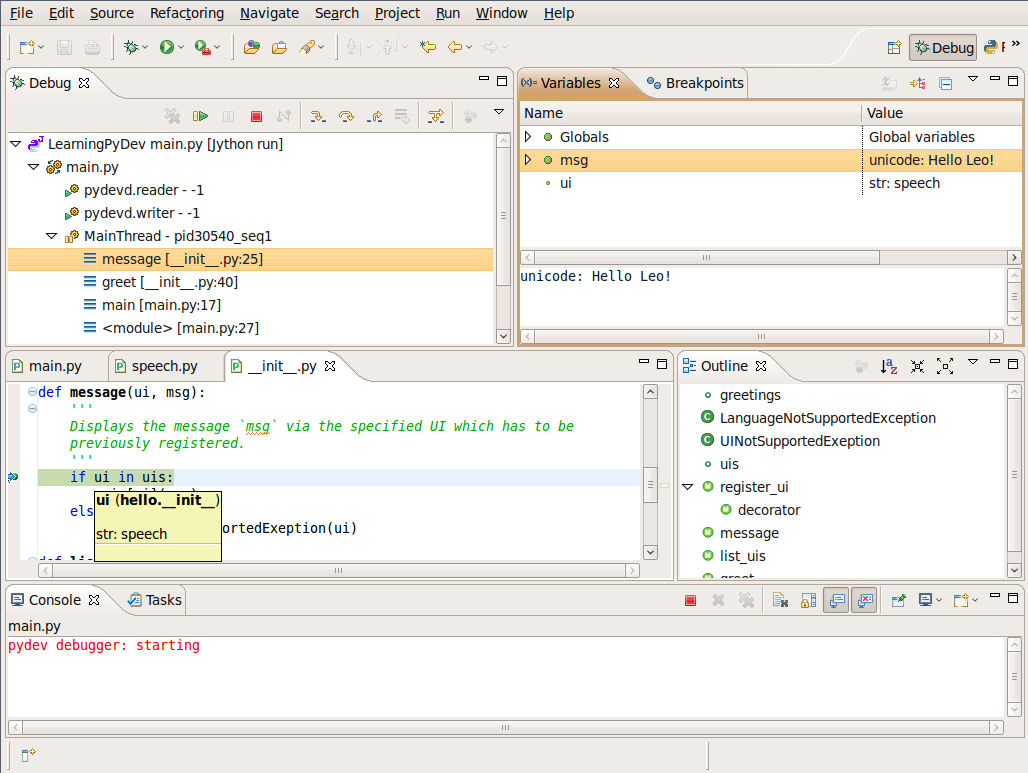
그림 11-6. 디버깅 화면
The perspective offers the typical elements of a debugger. In the upper left area in the contents of the ‘Debug’ tab we have the call stack for each running thread. Click on an item of the call to navigate to the particular line of code which made the corresponding call. The call stack view also has influence over what is shown by the Variables panel on the upper right-hand area, which lists all the current local and global variables. You can ‘drill down’ on every non-primitive value to see its components, as a tree. By default the variables shown are from the point of view of the code being currently executed. But if we select a different element on the call stack in the left area it will show the variables for the line of code associated with that particular stack frame.
Also in the same upper right-hand area there is the Breakpoints tab, which is quite useful for taking a global look at all the breakpoints defined. Clicking on the breakpoint entry will navigate the code editor to the associated line of code, of course. And you can disable, enable, and remove breakpoints by right-clicking on the entries.
The rest of the elements are already known: the central area is filled by the main editor (using less space this time to make room for the extra tools) and its outline, while the output console takes the lower area.
Once you reach a breakpoint you can control the execution, by using Step Into (F5) to go into the code of the next function call, Step Over (F6) to run the current line and stop again, Step Return (F7) to execute the remaining code of the current function, and Resume Execution (F8) to let the program continue running until the next breakpoint is reached (or the program finishes).
Once you finish your debugging session, you can go back to the normal editing perspective by selecting PyDev on the upper right-hand area of the main IDE Window (which will have the Debug button pushed while staying in the debugging perspective).
이클립스에 대한 결론
PyDev는 당신의 도구 상자에 중요한 요소가 될 수 있는 이클립스 플랫폼은 매우 성숙한 플러그인이다. 자동 완성과 제안 기능은 특히 인터랙티브 콘솔에 대응하는 경우에 새로운 API(파이썬과 자바 양쪽 다!)를 배우는 데 있어 많은 도움이 된다. 프로젝트 수준의 구성을 보통의 소스 관리 시스템을 통해 공유할 수 있으므로, 전체 팀에 자이썬 또는 특정 자이썬 프로젝트를 소개하기에도 좋다. 자바 쪽에서 온 개발자들에게는 익숙한 환경이 주는 편안함은 말할 것도 없다.
우리에게 통합개발환경은 우리 도구들 중에 유용한 부분이며, 우리가 미처 완전히 이해하지 못하고 있는 코드 기반 및 복잡한 코드를 빛나게 한다. 강력한 네비게이션과 리팩토링 기능은 그러한 프로젝트를 이해하는 데 있어 주요한 프로세스이며 미래에 나아질 것이다. 리팩토링 능력은 아직 자바 통합개발환경만큼 완전하지는 않지만, PyDev에 있는 ‘Extract local variable’, ‘Inline local variable’, ‘Extract method’는 꽤 유용하므로 써보기 바란다. 파이썬에서는 수작업으로 리팩토링하는 것이 자바(혹은 type inference를 제공하지 않는 다른 정적 유형 언어)에서만큼 힘들지는 않다 하더라도, 통합개발환경이 기계적인 일을 대신 처리해주므로 생산성이 보다 높아질 것이다.
끝으로, PyDev의 디버깅 능력은 대단하므로 가난한 자의 디버거 마냥 print를 사용할 일은 없어질 것이다.(사실 우리가 그동안 그렇게 해왔다!) import pdb; pdb.set_trace()의 비법을 마스터한 파이썬 고급 사용자라고 해도 한번쯤 시도해보기 바란다.
자, PyDev만 자이썬에서 유일한 통합개발환경은 아니다. 넷빈 통합개발환경을 이미 사용하고 있거나, 어떤 이유로 해서 이클립스 및 PyDev를 좋아하지 않는다면, 이 장의 나머지 부분에서 파이썬 개발을 위한 넷빈 플러그인을 다룰 것이니 살펴보기 바란다.
넷빈
Netbeans 통합 개발 환경(IDE)은 10년 넘도록 Java 커뮤니티를 돕고 있다. 그 시간동안, 넷빈은 평범한 자바 개발도구에서 현재는 자바나 다른 언어들을 위한 진보한 개발 도구이자 테스팅 환경으로 많은 성장을 했다. 자바와 JavaEE 어플리케이션 개발은 여전히 넷빈의 중요한 부분으로 남아있고, JRuby, Python, Groovy 그리고 Scala와 같은 다른 언어들은 각자 틈새공간을 만들며 자리를 잡고 있다. 넷빈을 확장하기 쉬운 IDE로 만드는 핵심 개발 환경의 플러그인들은 대부분의 이러한 언어들을 지원한다. 그리고 배포하기 위한 추가 기능을 구축하는 것은 매우 쉽다. 넷빈의 파이썬 지원은 nbPython으로 알려진 작은 플러그인으로 시작했다. 그러나 완전한 기능을 하는 파이썬 개발 환경으로 성장하였고, 성장을 계속하고 있다.
Netbeans 파이썬 지원은 코드 자동완성, 색상 강조, 쉬운 런타임 개발과 같은 통합 개발 환경의 모든 기능들을 개발자들에게 제공한다. 또한, 응용 프로그램을 디버깅하기 위한 멋진 고급 기능이 포함되어 있다.
IDE 설치 및 구성
넷빈 파이썬 개발 환경을 설치하기 위한 첫 번째 단계는 넷빈 통합개발환경IDE의 현재 릴리스를 다운로드하는 것이다. 이 글을 작성하는 때의 넷빈은 6.7.1이 가장 최근에 발표된 것이지만, 6.8 버전이 곧 발표되려 하고 있다(역자 주: 번역하는 시점인 2012년 6월에는 7.1.2판이 사이트에 올라와 있습니다). 웹 사이트 www.netbeans.org에 가서 다운로드 링크를 클릭하면 통합개발환경의 다운로드를 찾을 수 있다. 다운로드를 찾아가보면, 다양한 다운로드 옵션들을 볼 수 있다. 그 옵션들은 개발자들이 가장 많이 사용하는 것이 무엇인가에 따라 다른 기능들을 제공하는 것에 중점을 둔 통합개발환경의 변형들이다. 거대하고, 메모리 부족에 시달리는 개발도구가 극단적으로 컴퓨터를 분해하는 것을 바라는 사람은 없다. 통합개발환경의 여러 가지 구성을 제공해서, 넷빈은 추가되는 것을 제거할 수 있는 옵션과 개발에 필수적인 것들만 설치할 수 있는 옵션을 우리에게 제공한다. 통합개발환경을 위한 다양한 옵션들은 Java SE, Java, Ruby, C/C++, PHP 그리고 다른 모든 언어들을 포함한다. 단순한 자바 어플리케이션 개발에만 관심이 있는 개발자들은 Java SE를 다운로드하는 것으로 충분하다. 마찬가지로, 다른 언어에 관심이 있는 독자는 그 언어에 맞추어 구성된 통합개발환경을 다운로드할 수 있다. 이 책의 목적에 맞추어서 그리고 우리의 일상적인 개발에서, 우리는 가능한 모든 옵션들을 사용하는 것을 즐기기 때문에, 우리는 모든 옵션을 사용한다. 그러나, 만약 당신이 Java SE만 혹은, 다른 low-profil 빌드만 다운로드하고 후에 다른 것을 추가하길 원한다면 다음에 기능들을 추가할 수 있는 옵션들이 있다.
이 글을 작성하는 지금, PythonEA 배포를 위한 다운로드 페이지가 상단 근처에 링크되어 있다. 만약 PythonEA 링크, 혹은 비슷한 파이썬 넷빈 배포 링크가 사용가능 하다면, 그 링크를 이용하여 넷빈 통합개발환경의 자이썬 특화 기능들을 다운로드하고 설치할 수 있다. 순수하게 파이썬으로 이루어진 어플리케이션을 작성하려는 것이 아니라면 위에서 설명한 방법을 사용하지 않을 것을 권장한다. 자이썬 개발자 커뮤니티의 많은 사람들은 자바 코드를 사용하고, 그들의 어플리케이션들 내에서 자바와 자이썬을 통합할지도 모른다고 우리는 보고 있다. 이런 경우라면, 넷빈의 자바 특정 기능을 제공하기를 원할 것이다. 이것이 자이썬 개발자를 위해 파이썬 전용 배포판을 추천하지 않는 이유이지만, 선택은 여러분의 몫이다.
이제 통합개발환경를 얻었지만, 라이선스를 살펴보는 것이 중요하다. 넷빈을 위한 파이썬 지원은 CDDL 1.0 라이선스가 적용된다. 내용을 잘 살펴보길 바란다. 직관적인 넷빈 설치프로그램을 사용하면 어떤 환경에서도 쉽게 설치를 할 수 있다. 새로운 통합개발환경을 사용할 때 대부분의 어려운 작업은 아마도 당신의 필요에 따라 설정을 하는 부분일 것이다. 자바 뿐만 아니라 파이썬 설정도 매우 쉽기 때문에 넷빈의 경우는 쉽게 할 수 있다. 예를 들어, 만약 모든 기능 설치로 작업을 진행하면, 사용가능한 어플리케이션 서버를 갖게 된다(넷빈의 경우는 글래스피쉬Glassfish가 기본이다). 모든 잠재적인 보안 문제들을 방지하기 위해 설치하자마자 관리자 비밀번호를 바꾸는 것이 현명한 생각이다.
통합개발환경을 처음 시작하면, 넷빈 기능에 관한 블로그 및 기사들의 링크가 있는 화면을 보게 될 것이다. 당신은 또한 파일, 편집, 도구 등과 같은 표준 메뉴 항목을 사용할 수 있다. 우리는 이장에서 자이썬 기능을 설정하고 사용하는 부분만을 다룰 것이다. 넷빈을 다루는 매우 유용한 튜토리얼은 온라인과 책으로 접할 수 있다. 이 시점에서 주의해야 할 한가지는, 초기설치시에 PythonEA를 설치하지 않았다면 파이선/자이썬 개발 도구들이 설치 되지않는다는 것이다. 전체 넷빈 배포판(역자 주: 다운로드 할때 ALL이라는 항목을 선택했다는 의미이다)을 설치했다고 가정하면, 넷빈 플러그인 센터(Netbeans plug-in center)를 통해 파이썬 플러그인을 추가해야 할 것이다. 도구(Tools) 메뉴로 이동해서 하위 메뉴중 플러그인(Plug-in)을 열어라. 여기에서, Available Plug-ins 탭을 고르고, 카테고리(Category) 별로 정렬해라. 파이썬 카테고리에서 모든 플러그인들을 선택하고 설치하라. 이 옵션은 Jython 배포판 뿐만 아니라 파이썬 플러그인을 설치할 것이다. 화면에 나오는 지시대로 따라하면 설치를 마무리 지을 수 있다.
Note
역자 주: 이글을 번역하는 현재(2012년 5월)는 위와 같이 했을 때, 카테고리에 파이썬 항목이 없습니다. 따로 파이썬 관련 내용을 추가를 해줘야 합니다. 아래 링크를 참조해주세요. https://docs.google.com/document/pub?id=1Wy7rJWZBbI3MDrKVUtzpoy6vGljFPA227lGtAUMd_IE
플러그인 설치가 잘 되었다면, 다음은 파이썬과 자이썬 홈 경로를 설정할 시간이다. 설정을 하려면, Tools 메뉴로 가서, 파이썬 플랫폼 메뉴(Python Platforms)를 연다. 그러면 파이썬/자이썬을 위한 플랫폼 매니저가 열린다. 이 글을 작성하는 현재, 파이썬과 함께 설치된 자이썬 판은 2.5+ 이다. 당신이 사용하길 원하는 추가적인 묶음들packages을 포함하는 자이썬 설치판을 고를 수 있다. 자이썬 설치판을 고를려면, platfom option에 자이썬을 추가하고, Make Default를 클릭하면 된다(그림 11-7 참조).
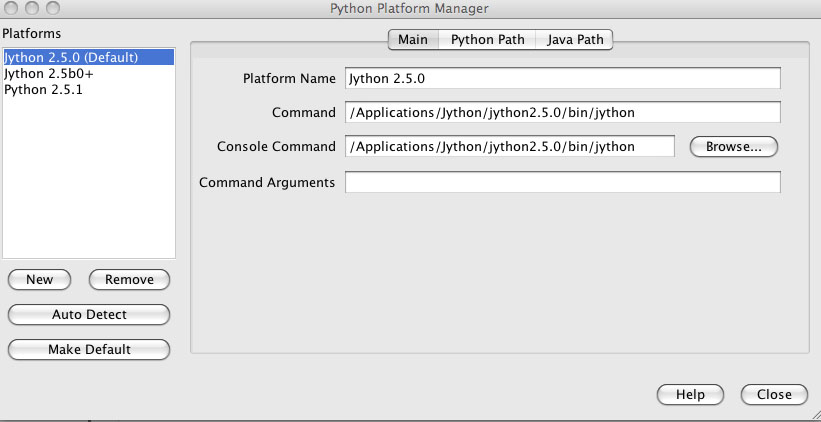
그림 11-7. 플랫폼 옵션에 Jython 설치를 추가하고, 기본값으로 지정하기.
설치돤 자이썬을 추가하고 기본으로 지정할려면, 플랫폼 목록 아래에 있는 NEW 버튼을 클릭하라. ‘Auto Detect option’을 사용할 수 있지만, 사용할 설치돤 자이썬을 찾는 넷빈은 운이 별로 좋지 못했다. New 버튼을 클릭하면, 파일 선택 창이 보일 것이다. <JYTHON_HOME>/bin 아래에 있는 자이썬 실행가능한 파일(역자 주: 윈도우의 경우 jython.bat)을 선택하면, 다른 모든 필요한 필드의 자동으로 올바른 값을 입력된다. 일단 완성 파이썬 플랫폼 관리자 창 하단에있는 닫기 단추를 선택한다. 자 이제 넷빈에서 파이썬, 자이썬과 함께 프로그래밍을 시작할 준비가 되었다.
고급 파이썬 옵션들
넷빈 환경설정(Tools > options) 창에 들어가면 파이썬 플러그인의 설정을 바꿀 수 있는 좀 더 많은 고급 옵션들을 볼것이다. 에디터 탭으로 이동하면, 서식, 코드 템플릿과 힌트에 관한 구체적인 옵션을 설정할 수 있다, 자이썬으로 작업할 때 넷빈이 보여주는 코드, 제공하는 도움에 대한 것들을 모두 설정할 수 있다. 또한, Fonts and Color 탭을 선택하여 파이썬 코드의 글꼴 및 색상을 선택할 수도 있다. 각각의 언어에 따라 다른 글꼴들과 색상들을 지정할 수 있다는 것은 넷빈이 얼마나 커스터마이즈하기 용이한지에 대한 한 예가 된다.
Miscellaneous 탭을 고르면 넷빈 통합개발환경에 다른 파일 형식들을 추가 하고, 다른 통합개발환경 기능들과 파일들을 연결할 수 있다. 파일의 풀다운 메뉴를 통해 보면, 파이썬 파일들과 관련된 py** 혹은 pyc 확장자를 가진 파일들을 볼 수 있다. 이것은 파일 확장자를 연결하면, 그 파일들의 지정된 넷빈 기능을 이용할 수 있게 해준다. 예를 들어, 자이썬과 관련된 어떤 파일들에 다른 확장자를 지정하길 원한다면, 넷빈에 파이썬 파일들과 이 확장자를 연결하면 쉽게 적용할 수 있다. 물론, 이런 방법으로 하면 자이썬은 모르는 확장자들을 임포트하지 않을 것이므로 추천하지는 않는다. 일단 연결을 만들고, 추가한 확장자로 파일을 만들 수 있다. 그러면 그 확장자의 파일이 파이썬 파일들인 것처럼 넷빈에서 사용할 수 있다. 마지막으로, 파이썬 탭에서는 파이썬 프로그램 인수를 위한 프롬프트 활성화하기나, 디버거 포트 바꾸기, 디버그 쉘 색 바꾸기 등과 같은 몇가지 기본 옵션들을 변경할 수 있다.
일반적인 파이썬 사용
이 장에서 이전에 언급한 바대로, 넷빈 파이썬을 사용할 때는 많은 옵션들이 있다. 새로운 파이썬 프로젝트를 시작할때 몇가지 다른 선택들을 할 수 있다. 파이썬 프로젝트를 생성할지, 기존 소스를 가긴 파이썬 프로젝트를 생성할 지 선택할 수 있다. 두 프로젝트 형식들을 매우 적절하게 이름지어진다;a Python Project 는 빈 프로젝트를 생성할 것이다, 일단 프로젝트를 만들면 매우 쉽게 어플리케이션들이나 스크립트들을 개발하고, 유지보수할 수 있다.. 그리고, Jean-Yves Mengant’s jpydbg debugger 에서 유래된 파이썬 디버커를 통해 당신의 어플리케이션을 디버그 할 수도 있고, 넷빈에서 테스트 할 수도 있다. 바로 알 수 있는 멋진 기능들 중 하나는 에디터에서 구문 색상 강조 기능이다.
Standalone Jython Apps
In this section, we will discuss how to develop a standalone Jython application within Netbeans. We will use a variation of the standard HockeyRoster application that we have used in other places throughout the book. Overall, the development of a stand-alone Jython application in Netbeans differs very little from a stand-alone Java application. The main difference is that you will have different project properties and other options available that pertain to creating Jython projects. And obviously you will be developing in Jython source files along with all of the color-coding and code completion, and other options that the Python plug-in has to offer.
To get started, go ahead and create a new Python Project by using the File menu or the shortcut in the Netbeans toolbar. For the purposes of this section, name the new project HockeyRoster. Uncheck the option to Create Main File, as we will do this manually. Once your project has been created, explore some of the options you have available by right-clicking (Ctrl-click) on the project name. The resulting menu should allow you the option to create new files, run, debug, or test your application, build eggs, work with code coverage, and more. At this point you can also change the view of your Python packages within Netbeans by choosing the ‘View Python Packages as’ option. This will allow you the option to either see the application in list or tree mode, your preference. You can search through your code using the Find option, share it on Kenai with the integrated Netbeans Kenai support, look at the local file history, or use your code with a version control system.
Note
In case you are not familiar with project Kenai, it is an online service started by Sun Microsystems for hosting open source projects and code. For more information, go to www.kenai.com and check it out.
Click on the Properties option and the Project Properties window should appear. From within the Project Properties window, there are options listed on the left-hand side including Source*,*Python*,*Run*,*and Formatting. The Source option provides the ability to change source location or add new source locations to your project. The Test Root Folders section within this option allows you to add a location where Python tests reside so that you can use them with your project. The Python option allows you to change your Python platform and add locations, JARs, and files to your Python path. Changing your Python platform provides a handy ability to test your program on Jython and Python alike, if you want to ensure that your code works on each platform. The Run option provides the ability to add or change the Main module, and add application arguments. Lastly, the Formatting option allows you to specify different formatting options in Netbeans for this particular project. This is great, because each different project can have different colored text, and so on, depending upon the options chosen.
At this point, create the Main module for the HockeyRoster application. Go to File>New and right-clicking (Cntrl-click) on the project, or use the toolbar icon. From here you can either create an Executable Module, Module, Empty Module, Python Package, or Unit Test. Choose to create an Executable Module and name the main file HockeyRoster.py*,* and keep in mind that when we created the project we had the ability to have the IDE generate this file for us but we chose to decline. Personally, we like to organize our projects using the Python packaging system. Create some packages now using the same process that you used to create a file and name the package jythonbook. Once created, drag your HockeyRoster.py module into the jythonbook package to move it into place. Note that you can also create several packages at the same time by naming a package like jythonbook.features or something of the like*,*which will create both of the resulting packages.
The HockeyRoster**main module will be the implementation module for our application, but we still need somewhere to store each of the player’s information. For this, we will create a module named Player. Go ahead and create an Empty Module named Player within the same jythonbook package. Now we will code the Player class for our project. To do so, erase the code that was auto-generated by Netbeans in the Player.py module and type the following. Note that you can change the default code that is created when generating a new file by changing the template for Python applications.
예제 11-15.
# Player.py
# Container to hold player information
class Player:

    def __init__(self, id, first, last, position):
        self.id = id
        self.first = first
        self.last = last
        self.position = position

    def add_assist(self):
        self.assists = assists + 1
The first thing to note is that Netbeans will maintain your indentation level. It is also easy to decrease the indentation level by using the SHIFT + TAB keyboard shortcut. Using the default environment settings, the keywords should be in a different color (blue by default) than the other code. Method names will be in bold, and references to self or variables will be in a different color as well. You should notice some code completion, mainly the automatic self placement after you type a method name and then the right parentheses. Other subtle code completion features also help to make our development lives easier. If you make an error, indentation or otherwise, you will see a red underline near the error, and a red error badge on the line number within the left-hand side of the editor. Netbeans will offer you some assistance in determining the cause of the error if you hover your mouse over the red error badge or underline.
Now that we have coded the first class in our stand-alone Jython application, it is time to take a look at the implementation code. The HockeyRoster.py module is the heart of our roster application, as it controls what is done with the team. We will use the shelve technique to store our Player objects to disk for the roster application. As you can see from the following code, this is a very basic application and is much the same as the implementation that will be found in the next chapter using Hibernate persistence.
예제 11-16.
# HockeyRoster.py
#
# Implementation logic for the HockeyRoster application

# Import Player class from the Player module
from Player import Player

# Import shelve for storage to disk
import shelve

class HockeyRoster:
    def __init__(self):
        self.player_data = shelve.open("players")

    def make_selection(self):
        '''
        Creates a selector for our application.  The function prints output to the
        command line.  It then takes a parameter as keyboard input at the command
        line in order to choose our application option.
        '''
        options_dict = {1:self.add_player,
                        2:self.print_roster,
                        3:self.search_roster,
                        4:self.remove_player}
        print "Please chose an option\\n"

        selection = raw_input('''Press 1 to add a player, 2 to print the roster,
                              3 to search for a player on the team,
                              4 to remove player, 5 to quit: ''')
        if int(selection) not in options_dict:
            if int(selection) == 5:
                print "Thanks for using the HockeyRoster application."
            else:
                print "Not a valid option, please try again\\n"
                self.make_selection()
        else:
            func = options_dict[int(selection)]
            if func:
                func()
            else:
                print "Thanks for using the HockeyRoster application."

    def add_player(self):
        '''
        Accepts keyboard input to add a player object to the roster list.
        This function creates a new player object each time it is invoked
        and appends it to the list.
        '''
        add_new = 'Y'
        print "Add a player to the roster by providing the following information\\n"

        while add_new.upper() == 'Y':
            first = raw_input("First Name: ")
            last = raw_input("Last Name: ")
            position = raw_input("Position: ")

            id = self.return_player_count() + 1
            print id
            #set player and shelve
            player = Player(id, first, last, position)
            self.player_data[str(id)] = player


            print "Player successfully added to the roster\\n"
            add_new = raw_input("Add another? (Y or N)")

        self.make_selection()

    def print_roster(self):
        '''
        Prints the contents of the list to the command line as a report
        '''
        print "====================\\n"
        print "Complete Team Roster\\n"
        print "======================\\n\\n"
        player_list = self.return_player_list()
        for player in player_list:
            print "%s %s - %s" % (player_list[player].first,
                    player_list[player].last, player_list[player].position)
        print "\\n"
        print "=== End of Roster ===\\n"
        self.make_selection()

    def search_roster(self):
        '''
        Takes input from the command line for a player's name to search within the
        roster list.  If the player is found in the list then an affirmative message
        is printed.  If not found, then a negative message is printed.
        '''
        index = 0
        found = False
        print "Enter a player name below to search the team\\n"
        first = raw_input("First Name: ")
        last = raw_input("Last Name: ")
        position = None
        player_list = self.return_player_list()

        for player_key in player_list:
            player = player_list[player_key]
            if player.first.upper() == first.upper() and \\
               player.last.upper() == last.upper():
                position = player.position

        if position:
            print '%s %s is in the roster as %s' % (first, last, position)
        else:
            print '%s %s is not in the roster.' % (first, last)
        self.make_selection()

    def remove_player(self):
        '''
        Removes a player from the list
        '''
        index = 0
        found = False
        print "Enter a player name below to remove them from the team roster\\n"
        first = raw_input("First Name: ")
        last = raw_input("Last Name: ")
        position = None
        player_list = self.return_player_list()
        found_player = None

        for player_key in player_list:
            player = player_list[player_key]
            if player.first.upper() == first.upper() and \\
               player.last.upper() == last.upper():
                found_player = player
                break

        if found_player:
            print '''%s %s is in the roster as %s,
                     are you sure you wish to remove?''' % (found_player.first,
                                                            found_player.last,
                                                            found_player.position)
            yesno = raw_input("Y or N")
            if yesno.upper() == 'Y':
                # remove player from shelve
                print 'The player has been removed from the roster',
                found_player.id
                del(self.player_data[str(found_player.id)])
            else:
                print 'The player will not be removed'
        else:
            print '%s %s is not in the roster.' % (first, last)
        self.make_selection()

    def return_player_list(self):
        return self.player_data

    def return_player_count(self):
        return len(self.player_data)

# main
#
# This is the application entry point.  It simply prints the applicaion title
# to the command line and then invokes the makeSelection() function.
if __name__ == "__main__":
    print "Hockey Roster Application\\n\\n"
    hockey = HockeyRoster()
    hockey.make_selection()
The code should be relatively easy to follow at this point in the book. The main function initiates the process as expected, and as you see it either creates or obtains a reference to the shelve or dictionary where the roster is stored. Once this occurs the processing is forwarded to the make_selection() function that drives the program. The important thing to note here is that, when using Netbeans, the code is laid out nicely, and that code completion will assist with imports and completion of various code blocks. To run your program, you can either right-click (Ctrl+click) on the project or set the project as the main project within Netbeans and use the toolbar or pull-down menus. If everything has been set up correctly, you should see the program output displaying in the Netbeans output window. You can interact with the output window just as you would with the terminal.
Jython and Java Integrated Apps
Rather than repeat the different ways in which Jython and Java can be intermixed within an application, this section will focus on how to do so from within the Netbeans IDE. There are various approaches that can be taken in order to perform integration, and this section will not cover all of them. However, the goal is to provide you with some guidelines and examples to use when developing integrated Jython and Java applications within Netbeans.
Using a JAR or Java Project in Your Jython App
Making use of Java from within a Jython application is all about importing and ensuring that you have the necessary Java class files and/or JAR files in your classpath. In order to achieve this technique successfully, you can easily ensure that all of the necessary files will be recognized by the Netbeans project. Therefore, the focus of this section is on using the Python project properties to set up the sys.path for your project. To follow along, go ahead and use your HockeyRoster Jython project that was created earlier in this section.
Let’s say that we wish to add some features to the project that are implemented in a Java project named HockeyIntegration that we are coding in Netbeans. Furthermore, let’s assume that the HockeyIntegration Java project compiles into a JAR file. Let’s set up the HockeyIntegration project by choosing New>Project. When the New Project window appears, select Java as the category, and Java Application as the project and click Next. Now make sure you name your application HockeyIntegration and click Finish. See 그림 11-8.
Your java application is now created and you are ready to begin development. In order to use this project from within our HockeyRoster project, you’ll need to open up the project properties by right-clicking on your Jython project and choosing the Properties option. Once the window is open, click on the Python menu item on the left-hand side of the window. This will give you access to the sys.path so you can add other Python modules, eggs, Java classes, JAR files, and so on. Click on the Add button and then traverse to the project directory for the Java application you are developing. Once there, go to the dist directory and select the resulting JAR file and click OK. You can now use any of the Java project’s features from within your Jython application.
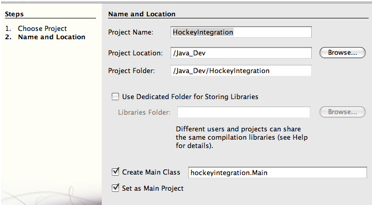
그림 11-8.
If you are interested in utilizing a Java API that exists within the standard Java library, then you are in great shape. As you should know by now, Jython automatically provides access to the entire Java standard library. You merely import the Java classes that you wish to use within your Jython application and begin using, nothing special to set up within Netbeans. At the time of this writing, the Netbeans Python EA did not support import completion for the standard Java library. However, we suspect that this feature will be added in a subsequent release.
Using Jython in Java
If you are interested in using Jython or Python modules from within your Java applications, Netbeans makes it easy to do. As mentioned in Chapter 10, the most common method of utilizing Jython from Java is to use the object factory pattern. However, there are other ways to do this, such as using the clamp project, which is not yet production-ready at the time of writing. For the purposes of this section, we’ll discuss how to utilize another Netbeans Jython project as well as other Jython modules from within your Java application using the object factory pattern.
In order to effectively demonstrate the use of the object factory pattern from within Netbeans, we’ll be making use of the PlyJy project, which provides object factory implementations that can be used out of the box. If you haven’t done so already, go to the Project Kenai site find the PlyJy project and download the provided JAR. We will use the Netbeans project properties window in our Java project to add this JAR file to our project. Doing so will effectively diminish the requirement of coding any object factory implementations by hand and we’ll be able to directly utilize Jython classes in our project.
Create a Java project named ObjectFactoryExample by selecting New>Project>Java Application. Once you’ve done so, right-click (Cntrl+click) on the project and choose Properties. Once the project properties window appears, click the Libraries option on the left-hand side. From there, add the PlyJy JAR file that you previously downloaded to your project classpath. You will also have to add the jython.jar file for the appropriate version of Jython that you wish to use. In our case, we will utilize the Jython 2.5.1 release. See 그림 11-9.
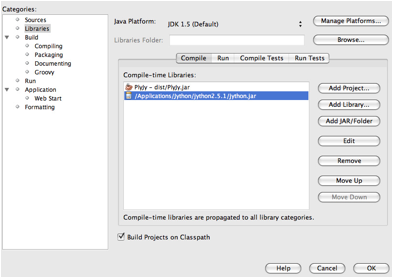
그림 11-9. Adding the JAR file
The next step is to ensure that any and all Jython modules that you wish to use are in your CLASSPATH somewhere. This can be easily done by either adding them to your application as regular code modules somewhere and then going into the project properties window and including that directory in the Compile-Time Libraries list contained the Libraries section, or by clicking the Add JAR/Folder button. Although this step may seem unnecessary because the modules are already part of your project, it must be done in order to place them into your CLASSPATH. Once they’ve been added to the CLASSPATH successfully, you can begin to make use of them via the object factory pattern. Netbeans will seamlessly use the modules in your application as if all of the code was written in the same language. At this point your project should be set up and ready for using object factories. To learn more about using object factories, please refer to Chapter 10.
The Netbeans Python Debugger
As mentioned previously, the Netbeans IDE also includes a Python debugger that is derived from Jean-Yves Mengant’s jpydbg debugger. This section will discuss how to make use of the Netbeans Python debugger along with some examples using our HockeyRoster code that was written in the previous section. If you have used a debugger in another IDE, or perhaps the Java debugger that is available for Netbeans, this debugger will feel quite familiar. The Python debugger includes many features such as breakpoints, run-time local variable values, code stepping, and more.
Prior to using the debugger, it may be useful to take a look at the debugger preferences by navigating to the Netbeans Preferences>Python Options>Debugger window. From there you will see that you have the ability to change the debugger port, code coloring for debugging sessions, and to stop at the first line of the script or continue until the debugger reaches the first breakpoint. To make the debugger feel and act similar to the Netbeans Java debugger, you may want to de-select the ‘Stop at the first line’ checkbox. Otherwise the debugger will not load your module right away, but rather stop execution at the first line of your module and wait for you to continue. See 그림 11-10.
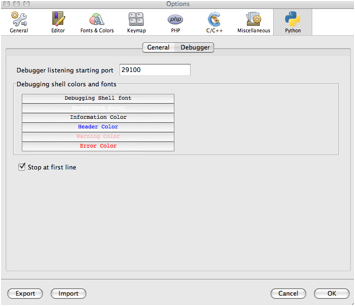
그림 11-10. The Netbeans Python debugger
Making use of the Python debugger included with Netbeans is much like working from the Jython interactive interpreter from the command-line or terminal window. If you have selected the ‘Stop at first line’ checkbox in the debugger preferences, the debugger will halt at the first line of code in your main module and you must use the debugger Continue button to move to the first line of code that is executed. However, if you have de-selected the checkbox, then the module will automatically run your program until it reaches the first breakpoint. For the purposes of this exercise, let’s keep the checkbox selected. In order to set a breakpoint, click on the margin to the left of the line in your code where you would like the debugger to halt program execution. In our case, let’s open the HockeyRoster.py module and set a breakpoint in the code as shown in 그림 11-11.
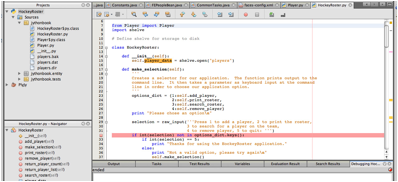
그림 11-11. Setting a breakpoint in the code
Now that we’ve set a breakpoint, we need to start our debugger. However, prior to debugging it is important to make sure that Netbeans knows which module to use for starting the program. To do so, right-click on your project and select Properties. When the properties window opens, select Run in the left-hand side of the window. You should now type or browse to the module that you wish to use as a starting point for your program. See 그림 11-12.
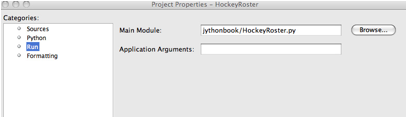
그림 11-12. Click Browse to select the module you wish to use as a starting point.
이것은 이미 Netbeans에 의해 자동으로 채워져있을 수도 있다. 일단 주 모듈을 설정했음을 확인했다면, 디버깅 세션을 시작할 수 있다. 그렇게 하려면 프로그램을 선택하고 Debug 메뉴를 선택하거나, 프로젝트를 오른쪽 클릭하여 Debug를 선택하면 된다. 디버거를 일단 시작하면, IDE 아래쪽의 디버깅 창에 디버거가 시작되었음을 알리는 메시지들이 나타나는 것을 볼 수 있을 것이다. 몇 초 후에 디버거 출력 창에 메시지가 나타나는 것이 멈추면, 편집기에서 주 모듈의 첫 행에 초점이 맞춰지고 녹색으로 표시될 것이다. 그림 11-13을 보라.
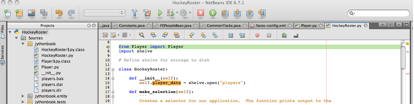
그림 11-13. 디버깅 세션을 시작
첫 줄에 걸려있는 디버거를 계속 하려면, 도구모음에서 녹색의 Continue 단추를 선택하거나 F5 키를 누른다. 디버거 출력창을 통해 프로그램이 실행되기 시작하고, 선택을 입력할 수 있도록 멈추는 것을 볼 수 있을 것이다. 그림 11-14를 보라.

그림 11-14. 디버거 출력 창
커서가 디버거 출력창에 있는지 확인하고 1을 입력하여 선수를 추가한다. Enter 단추를 눌러서 계속하면, 프로그램은 실행을 계속하는 대신, 여러분이 지정해둔 중단점에서 멈춘다. 중단점으로 설정해둔 행이 편집기에서 녹색으로 강조된 것을 볼 수 있을 것이다. 이때 디버거는 이 프로그램에서 정지 상태이며, 그로 하여금 프로그램이 이 시점에서 정확히 무슨 일이 벌어지고 있는지 확인할 수 있도록 해준다. 예를 들어, 넷빈 IDE 하단의 Variables 탭을 선택하면, 프로그램의 현재 상태의 모든 지역 변수를 볼 수 있다. 그림 11-5를 보라.

그림 11-15. 프로그램의 현재 시점에서의 모든 지역 변수의 값
또한 Call Stack 탭을 선택하여 프로그램의 현 시점의 실행 순서를 볼 수 있다. 그림 11-5를 보라.

그림 11-16. 프로그램의 실행 순서
일단 중단점에서 프로그램을 평가한 후에는, 도구모음의 단추를 사용하여 코드를 한 단계 진행할 수 있다. Continue 단추를 클릭하여 다음 중단점까지 프로그램을 실행할 수 있으며, 더 이상 중단점이 없는 경우에는 정상적으로 프로그램의 실행을 계속하게 된다. 디버거는 코드를 단계적으로 진행하면서 한 줄, 한 줄 실행시키면서 프로그램 코드의 특정한 행을 평가하고자 할 때에 특히 유용하다.
디버거의 또 다른 좋은 점은 중단점에서 특정한 조건을 설정할 수 있다는 것이다. 코드에서 중단점을 설정하고 오른쪽 클릭하여, 창에서 Breakpoint를 선택한 다음 Properties를 선택한다. 그렇게 하면 추가적인 중단점 선택사항이 표시된다. 이 경우에는, 그림 11-17과 같이 조건을 설정하여 디버거가 selection 변수의 값이 3일 때에만 멈추도록 한다.
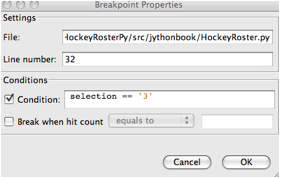
그림 11-17. 디버거 중단 조건 설정
디버거의 실행을 재개할 수 있으며, 프로그램 실행 중에 3을 선택하면 디버거가 중단됨을 알 수 있을 것이다
넷빈 파이썬 디버거는 이 장 전체를 채울 만큼 많은 기능을 제공하지만, 여러분이 시작하기에는 특히 이 섹션에서 다룬 내용이 도움이 되기를 기대한다.디버거의 사용법을 익히고 나면, 많은 시간을 절약할 수 있을 것이다.
또 다른 넷빈 파이썬 기능
넷빈 파이썬 IDE에는 우리가 손대지 않은 다른 많은 기능이 있다. 예들 들어, 임의의 파이썬 모듈에 대한 최소한의 리팩토링을 지원한다. 프로젝트 네비게이터 또는 모듈 내에서 오른쪽 클릭하면, 메뉴에서 추가적인 선택을 할 수 있다. Refactoring 옵션을 사용할 수 있음을 알 수 있을 것이다. 하지만 이 글을 쓰는 지금은 Rename, Move, Copy 그리고 Safely Delete만을 제공한다. 변수를 강조하고 그것의 정의를 쉽게 찾아가도록 하는 Navigate 기능이 있다. 또한 Navigate 기능은 행 번호를 가지고 코드를 쉽게 찾아갈 수 있도록 해준다. 파이썬 클래스가 다른 개체를 상속하고 있다면, 역시 Navigate 기능을 통해 상위 클래스의 구현부로 쉽게 찾아갈 수 있다. Find Usages 기능을 사용하면 어떠한 파이썬 모듈, 메소드, 함수 및 변수를 쉽게 찾을 수 있다. 코드가 제대로 포맷되지 않았다면, 오른쪽 클릭 메뉴에서 Format을 선택하면 IDE가 재빨리 포맷해준다.
오른쪽 클릭 메뉴의 또 다른 훌륭한 기능은 Insert Code이다. 이 기능은 IDE 자동 생성 코드를 위하여 여러 템플릿들 중에 하나를 선택할 수 있도록 해준다. Insert Code를 선택하면, 다른 메뉴가 나타나서 Property, Constructor, Method 및 Class 중 하나의 코드 템플릿을 선택할 수 있도록 해준다.템플릿을 선택하면, IDE는 일반적인 파이썬 속성, 생성자, 메소드 또는 클래스의 코드를 자동으로 만들어준다. 그런 다음 필요에 따라 자동으로 생성된 코드를 수정할 수 있다. 이 기능은 개발자로 하여금 타자를 줄이고, 프로그램 전체에 걸쳐서 코드를 일관적으로 작성하도록 도와준다. 그림 11-18을 보라.
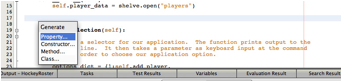
그림 11-18. 매우 편리한 Insert Code 옵션
또 다른 멋진 기능으로 Fast Import가 있다. 이것은 개체를 사용하기 위해 필요한 모듈을 IDE가 자동으로 import해주는 기능이다. Fix Imports 기능도 있어서, 코드에서 사용하지 않는 import를 정리해준다.
넷빈 IDE의 다른 모든 기능과 함께, 이러한 추가 기능들은 마치 케이크 위를 icing하는 것과 같다! 이러한 추가적인 기능을 사용하기 위해 반드시 오른쪽 클릭을 할 필요 없이, 키보드 단축키를 사용할 수도 있다. 단축키는 사용중인 운영 체제에 따라 차이가 있을 수 있다.
요약
대부분의 다른 언어와 마찬가지로, 자이썬 개발에 있어서는 몇 가지 IDE 가운데에서 선택을 할 수 있다. 이 장에서는 자이썬 개발에 있어서 가장 널리 사용되는 IDE인 넷빈과 이클립스를 살펴보았다. 이클립스는 독립실행 및 웹 기반 양쪽의 자이썬 개발에 있어 완전한 IDE 솔루션이다. PyDev는 지속적으로 개발 및 개선이 이루어지고 있으며 새로운 기능이 계속 추가되고 있다.
넷빈은 이 글을 쓰고 있는 현재 자이썬에 대한 지원이 개발중이다. 코드 완성과 구문 색상 강조 등의 주요 기능은 이미 자리를 잡고 있다. 웹 기반 애플리케이션은 물론 자이썬과 자바 통합을 포함하는 자이썬 애플리케이션의 개발이 가능하다. 앞으로, 넷빈의 자이썬 지원은 더욱 많은 기능을 지원하여 앞으로의 릴리스에서는 이 책을 모두 커버할 것이다.
다음 장에서, 우리는 데이터베이스를 사용하는 애플리케이션을 살펴볼 것이다. zxJDBC API를 다룰 것이며 표준 데이터베이스 트랜잭션을 사용하여 자이썬 애플리케이션을 개발하는 방법을 배울 것이다. 개체 관계 대응 또한 여러 가지 형태로 자이썬에서 사용할 수 있으며, 많은 선택사항에 대하여 논의할 것이다.